事隔一年,Raspberry Pi 基金會 將 Raspberry Pi Pico 升級至 Raspberry Pi Pico W
而且 Raspberry Pi Pico W 亦只需要 6美金 便可以購買到,在下當然不會放過
而且 Raspberry Pi Pico W 亦只需要 6美金 便可以購買到,在下當然不會放過
Raspberry Pi Pico W 在 2022年6月30日 推出,但各大供應商都是顯示沒有存貨或不會運送至香港
在下足足等到9月26日,終於可以在香港代理購買到 Raspberry Pi Pico W
在下足足等到9月26日,終於可以在香港代理購買到 Raspberry Pi Pico W
外觀

Raspberry Pi Pico W 的正面


Raspberry Pi Pico W 的版權資訊

與 Raspberry Pi Pico 相同的 BOOTSEL按鈕 ,在起動前緊按以導入 UF2檔案

與 Raspberry Pi Pico 相同的 電路板LED
但 Pico W 操作 LED 的方法與 Pico 略有不同,稍後會介紹
但 Pico W 操作 LED 的方法與 Pico 略有不同,稍後會介紹

使用 RP2-B2 的 RP2040 微控制器晶片
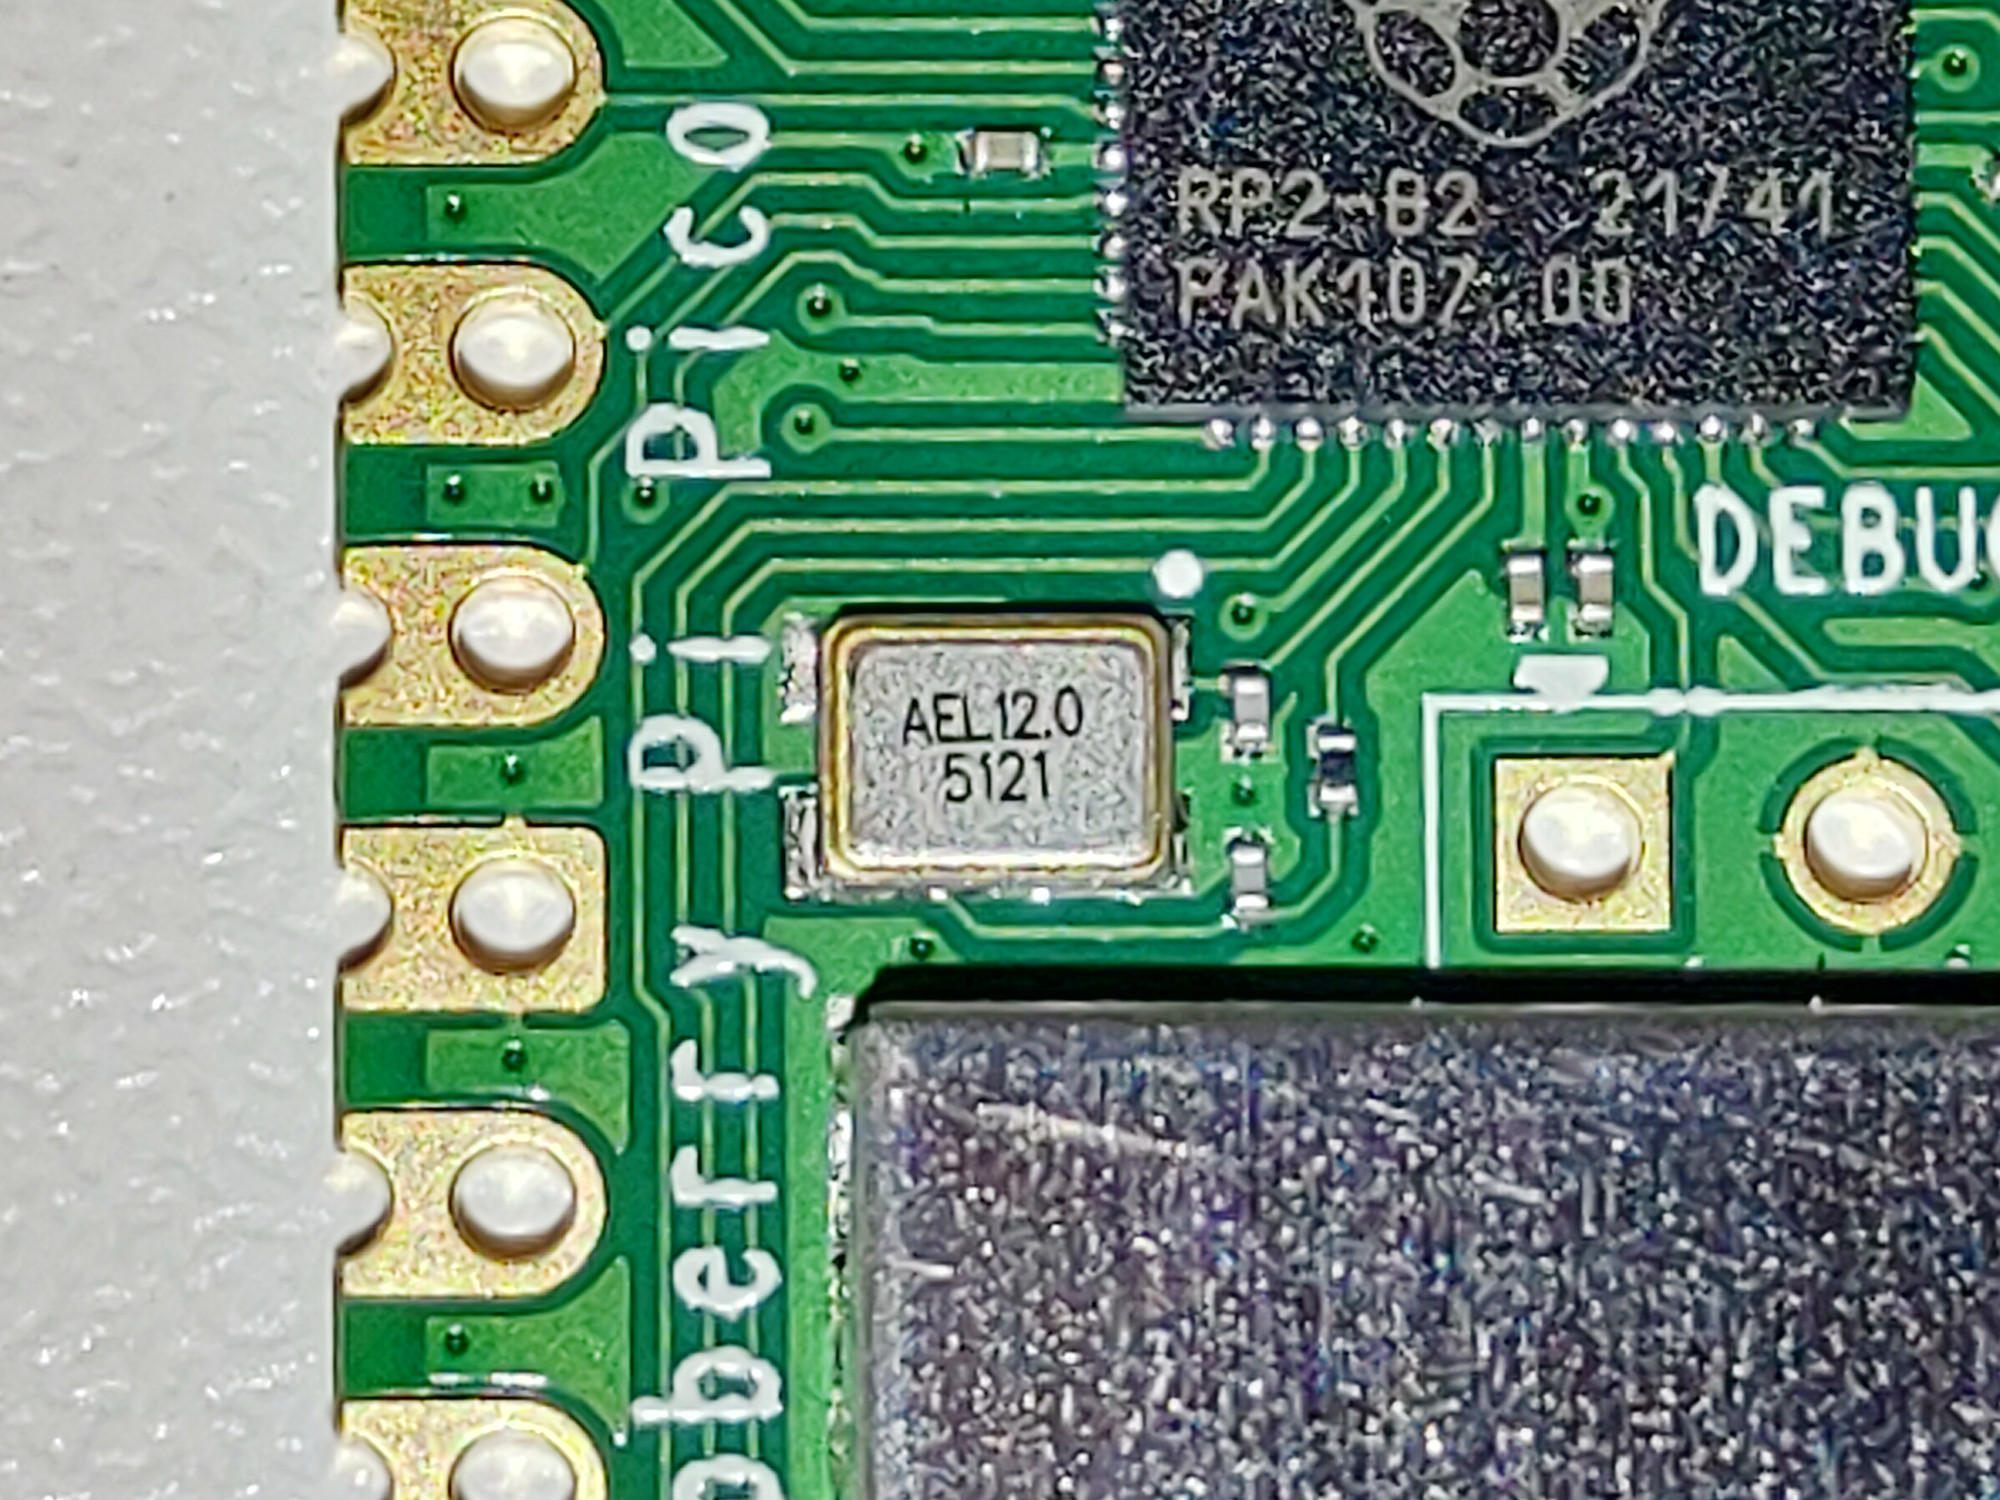
與 Raspberry Pi Pico 相同的 AEL12.0 晶體振盪器
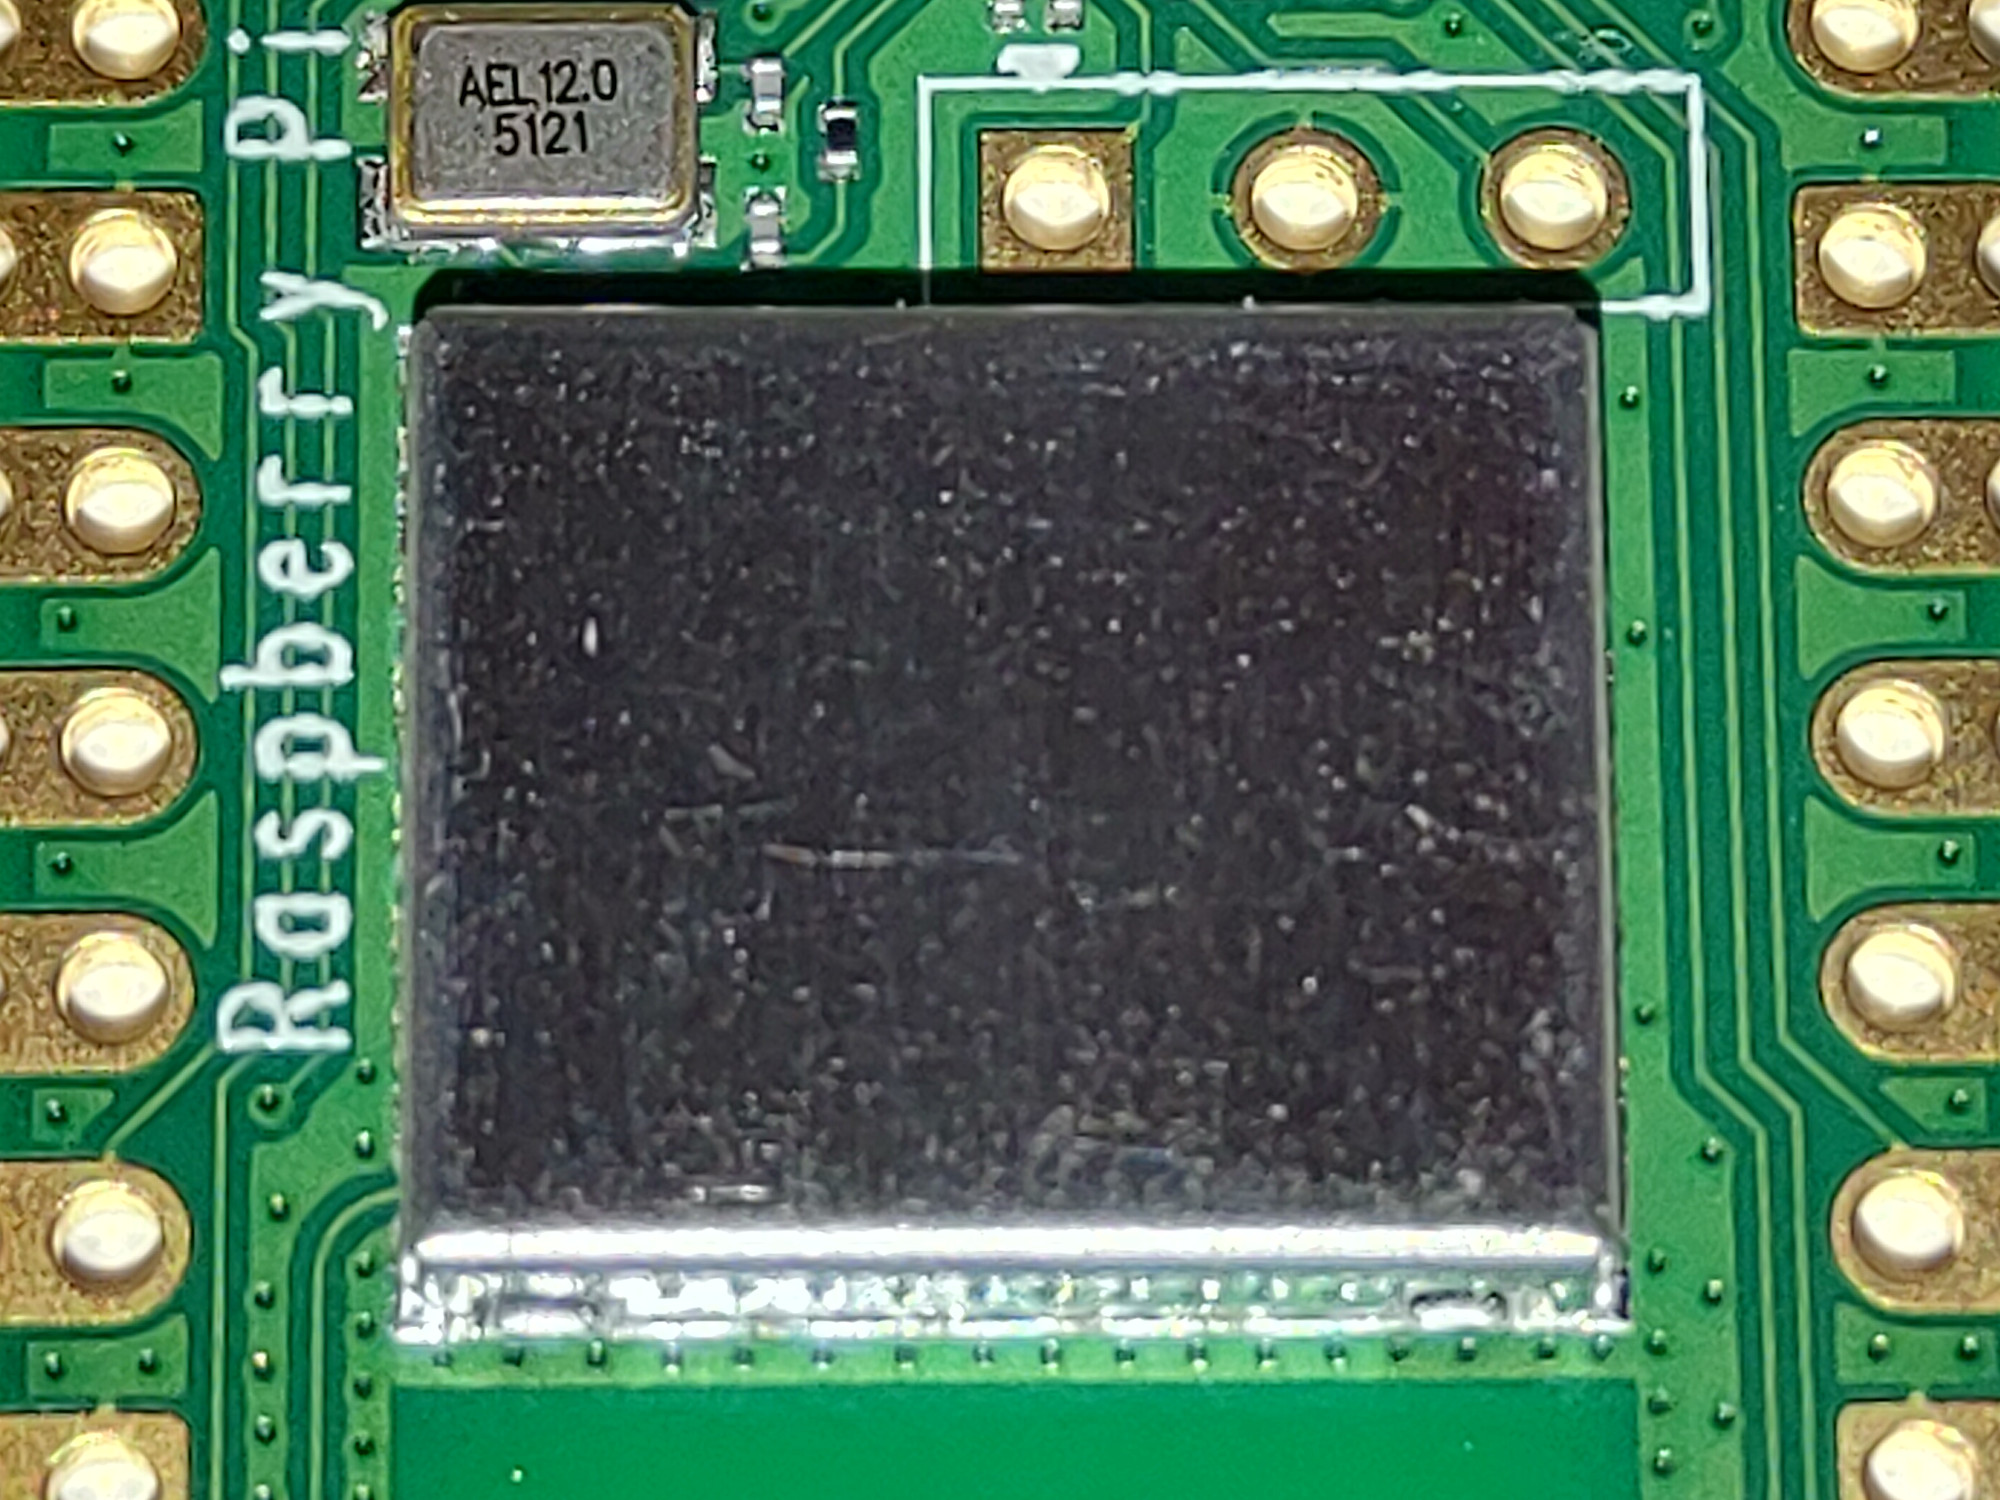
Raspberry Pi Pico W 安裝了 CYW43439 無線通訊晶片
包含 2.4 GHz Wi-Fi 4 (802.11n) 及 Bluetooth 5.2
包含 2.4 GHz Wi-Fi 4 (802.11n) 及 Bluetooth 5.2
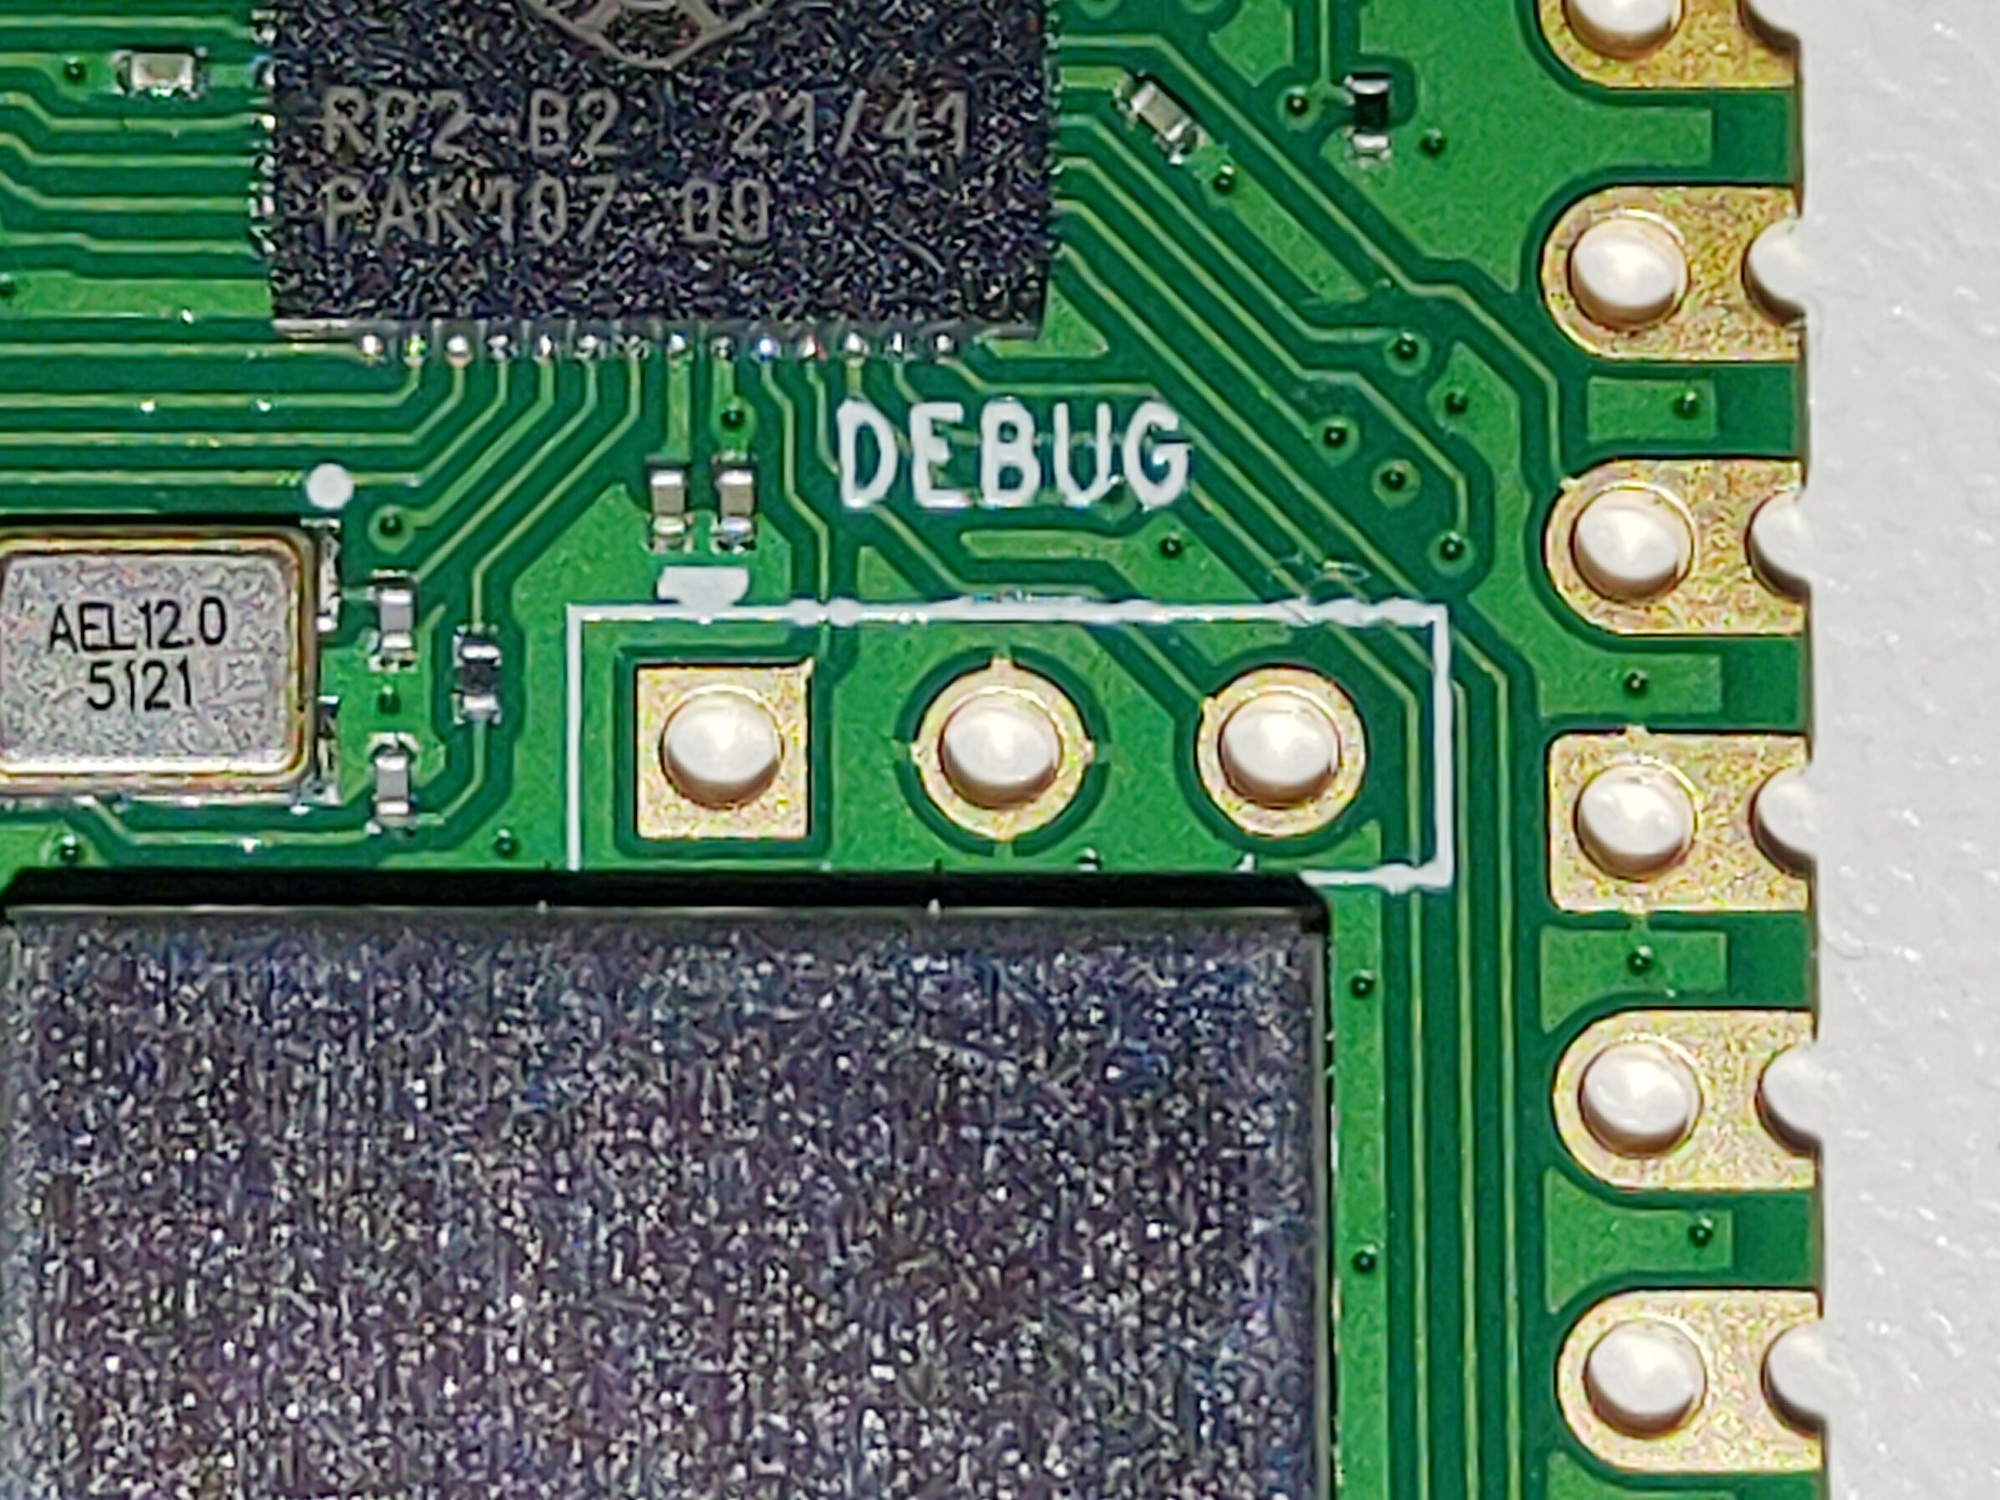
Raspberry Pi Pico W 同樣有 Debug引腳

與 Raspberry Pi Pico 相同,使用 Micro USB Type-B 作為接駁插口

Raspberry Pi Pico W 的背面

Raspberry Pi Pico 及 Raspberry Pi Pico W

在下按引腳的功能焊接對應的顏色引腳,與在下的 Raspberry Pi Pico 相同
測試
Raspberry Pi Pico W 同樣支援 MicroPython 、 CircuitPython 及 Arduino 的 AVR-C
MicroPython
Thonny IDE 仍然是建議首選
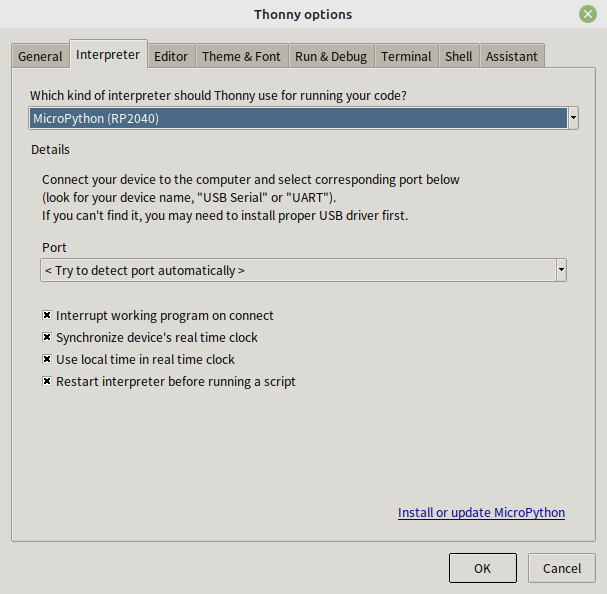
使用 Thonny IDE 編寫 MicroPython 時要留意 Raspberry Pi Pico W 要選擇 MicroPython (RP2040)
不是 MicroPython (Raspberry Pi Pico) ,否則安裝的 MicroPython 的 韌體 不會完全支援 Raspberry Pi Pico W
然後按 Install or update MicroPython
使用 Thonny IDE 編寫 MicroPython 時要留意 Raspberry Pi Pico W 要選擇 MicroPython (RP2040)
不是 MicroPython (Raspberry Pi Pico) ,否則安裝的 MicroPython 的 韌體 不會完全支援 Raspberry Pi Pico W
然後按 Install or update MicroPython
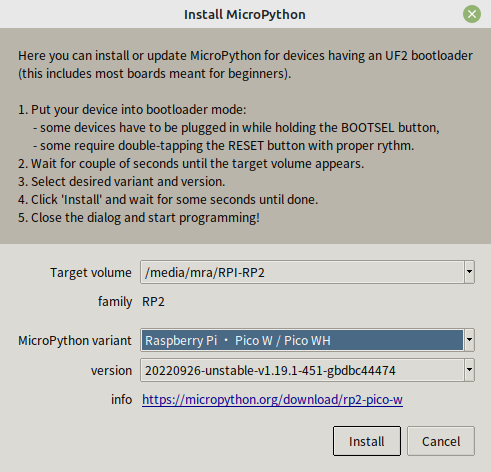
選擇正確的底板型號,即是 Raspberry Pi Pico W 及 最新版本的韌體
然後按 Install 按鈕
然後按 Install 按鈕

有時可能無法經由 Thonny IDE 下載 MicroPython 韌體
可以手動前往支援 Raspberry Pi Pico W 的 MicroPython 專頁,再手動下載及安裝
可以手動前往支援 Raspberry Pi Pico W 的 MicroPython 專頁,再手動下載及安裝

到 https://www.micropython.org/download/rp2-pico-w/ 下載最新版本支援的 Raspberry Pi Pico W 的 MicroPython 韌體

但在下使用懶惰方法
將下載檔案的連結複製,開啟 Terminal 到 Raspberry Pi Pico W 的儲存位置,輸入
將下載檔案的連結複製,開啟 Terminal 到 Raspberry Pi Pico W 的儲存位置,輸入
prefix="https://micropython.org"
wget \
"${prefix}"\
`curl "${prefix}/download/rp2-pico-w/" \
| grep "<a.*\.uf2" \
| head -1 \
| sed -r 's/.*href="([^"]+)".*/\1/g'`
以 MicroPython 編寫 LED閃燦 測試
import machine, time

led = machine.Pin("LED", machine.Pin.OUT)

while True:
	led.value(not led.value())
	time.sleep(0.5)
閣下應該會發現在下使用電路板上的 LED 不是使用 25 而是使用 "LED" 字串
原因是 Raspberry Pi Pico W 的 電路板LED 使用 WL_GPIO0 而不再是 GPIO25
原因是 Raspberry Pi Pico W 的 電路板LED 使用 WL_GPIO0 而不再是 GPIO25
CircuitPython

到 https://circuitpython.org/board/raspberry_pi_pico_w/ 下載最新版本支援的 Raspberry Pi Pico W 的 CircuitPython 韌體

同樣在下使用懶惰方法下載及安裝 CircuitPython 韌體到 Raspberry Pi Pico W
wget \
`curl "https://circuitpython.org/board/raspberry_pi_pico_w/" \
| grep "<a.*en_US.*\.uf2" \
| head -1 \
| sed -r 's/.*href="([^"]+)".*/\1/g'`
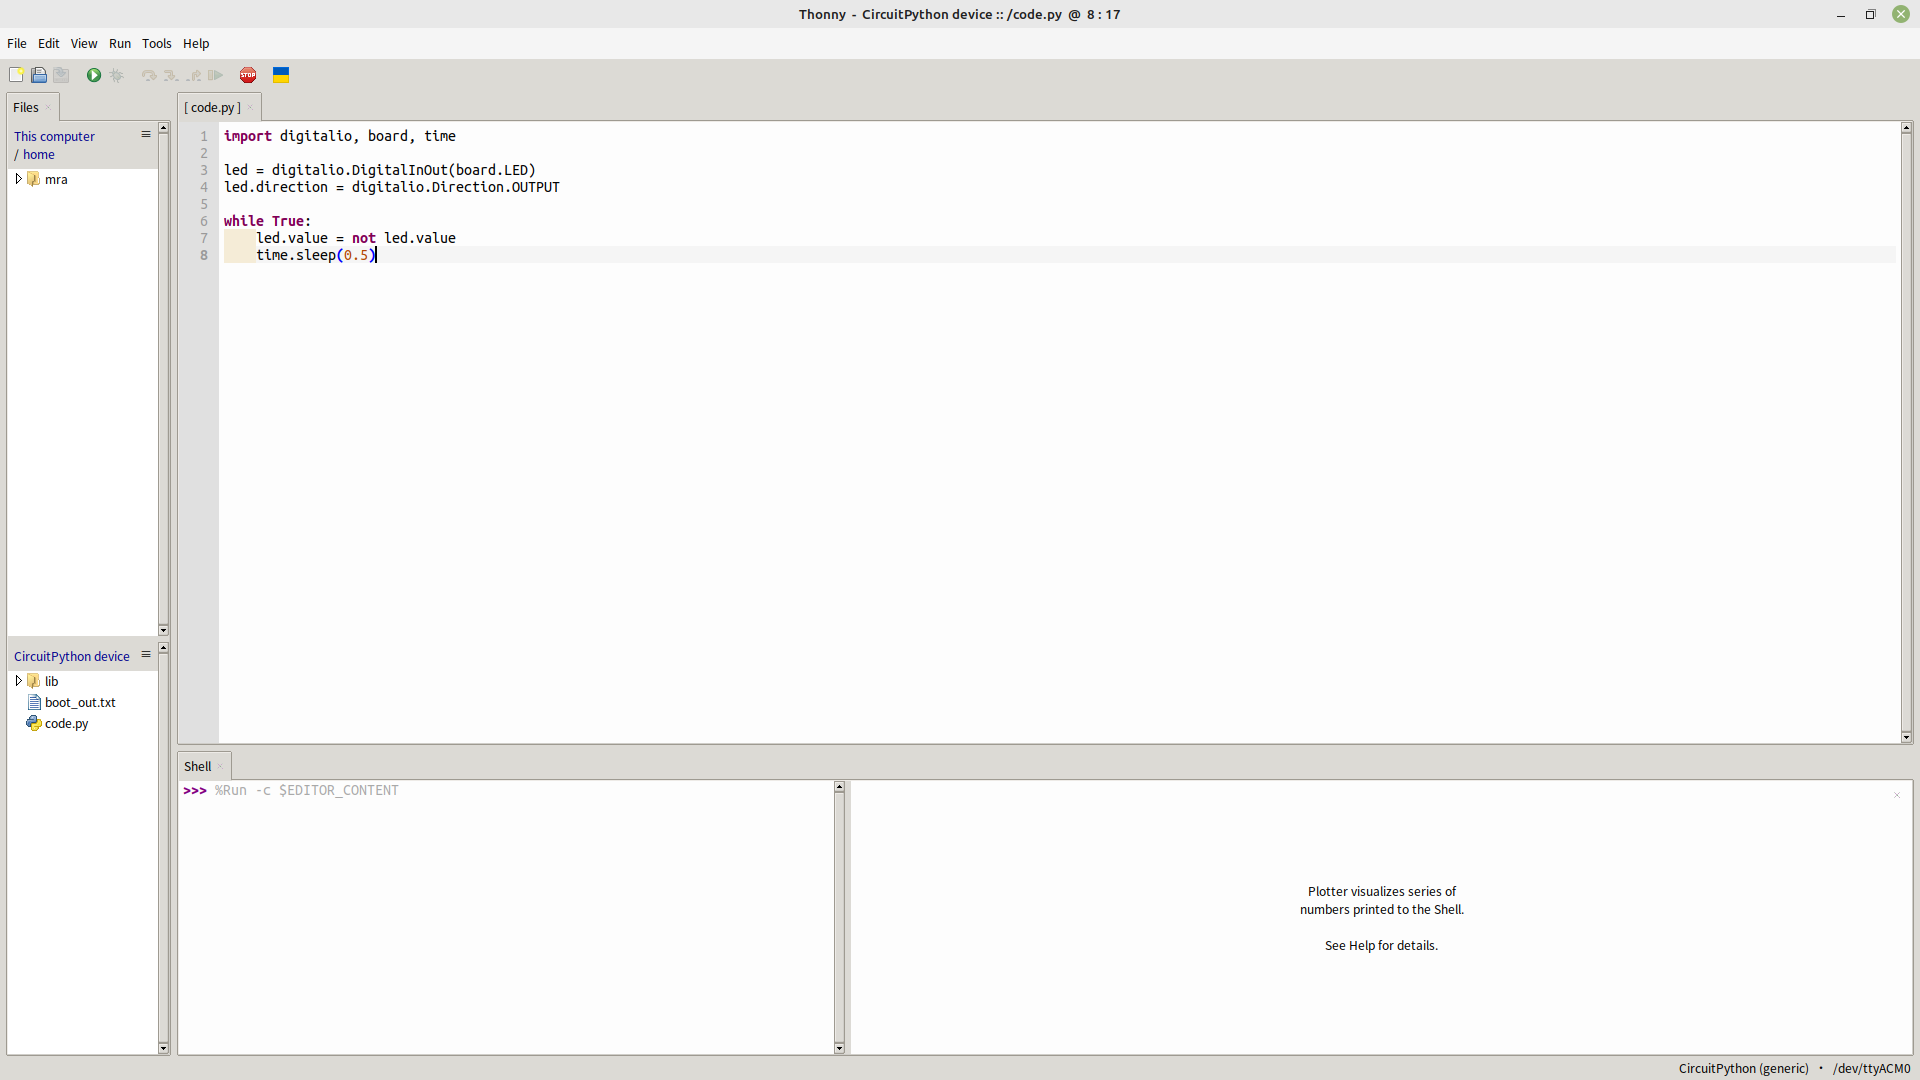
以 CircuitPython 編寫 LED閃燦 測試
import digital, board, time

led = digitalio.DigitalInOut(board.LED)
led.direction = digital.Direction.OUTPUT

while True:
    led.value = not led.value
    time.sleep(0.5)
閣下可能會發現 Raspberry Pi Pico W 的 電路板LED 與 Raspberry Pi Pico 相同,都是使用 board.LED 即可
原因是 CircuitPython 將 board.LED 的資料指向 WL_GPIO0 的引腳,因此不需要修改程式碼
亦表示使用 CircuitPython 編寫 Raspberry Pi Pico 的程式,可以不需要修改便可以在 Raspberry Pi Pico W 中使用
原因是 CircuitPython 將 board.LED 的資料指向 WL_GPIO0 的引腳,因此不需要修改程式碼
亦表示使用 CircuitPython 編寫 Raspberry Pi Pico 的程式,可以不需要修改便可以在 Raspberry Pi Pico W 中使用
Arduino 1.x IDE
由於 Arduino 推出了 Arduino 2.x IDE 正式版,但與 Arduino 1.x IDE 操作及支援稍有分別
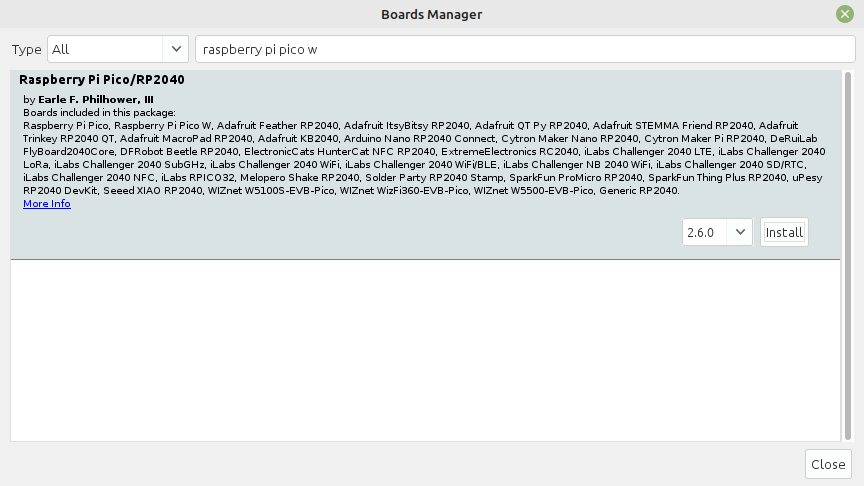


使用 Arduino 1.x IDE ,到 Boards Manager 搜尋 Raspberry Pi Pico W 並安裝最新版本

到 Tools > Board: > Raspberry Pi RP2040 Boards(2.6.0) 選擇 Raspberry Pi Pico W

將 Sketch 編譯並上載到 Raspberry Pi Pico W
Arduino 2.x IDE

使用 Arduino 2.x IDE ,到 Boards Manager 搜尋 Raspberry Pi Pico W 但卻沒有搜尋結果

到 File > Preferences > Additional Boards Manager URLs
加入 https://github.com/earlephilhower/arduino-pico/releases/download/2.6.0/package_rp2040_index.json
加入 https://github.com/earlephilhower/arduino-pico/releases/download/2.6.0/package_rp2040_index.json

加入新資源後,等待更新來源

安裝支援 Raspberry Pi Pico W 的編譯器
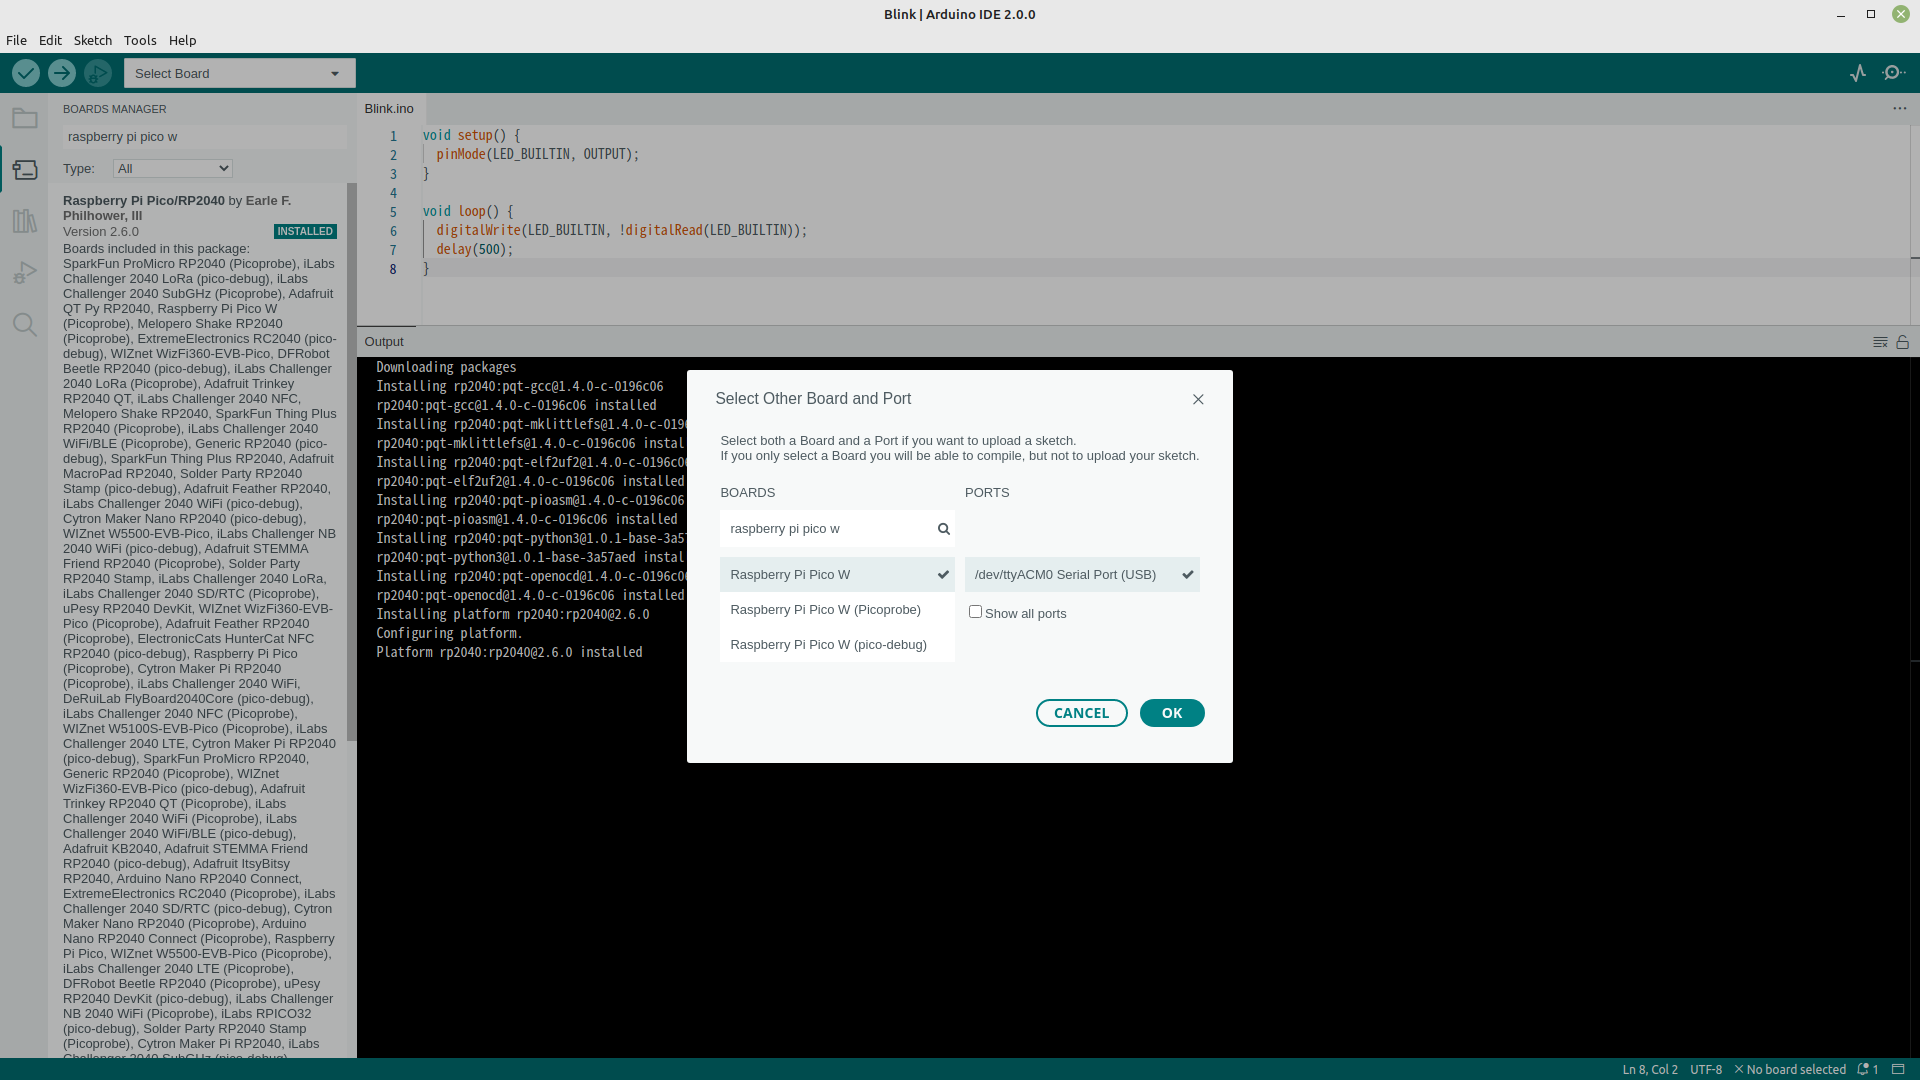
安裝後選擇 Raspberry Pi Pico W

將程式碼編譯並上載到 Raspberry Pi Pico W
使用 Arduino IDE 編寫 LED閃燦 測試
void setup() {
	pinMode(LED_BUILTIN, OUTPUT);
}

void loop() {
	digitalWrite(LED_BUILTIN, !digitalRead(LED_BUILTIN));
	delay(500);
}
在下使用 Arduino IDE 基本的 LED閃燦範例,同樣發現使用 LED_BUILTIN 即可成功
與 CircuitPython 相同,可以不需要修改程式碼便可以立即執行結果
與 CircuitPython 相同,可以不需要修改程式碼便可以立即執行結果
另外,使用 Arduino IDE 亦可以將 UF2檔案 保留
按需要時直接將 UF2檔案 複製到 Raspberry Pi Pico W 便可以立即使用
按需要時直接將 UF2檔案 複製到 Raspberry Pi Pico W 便可以立即使用
架設網頁伺服器
Raspberry Pi Pico W 最大優點是內建 Wi-Fi 模組,不需要額外模組
因此架設網頁伺服器變得更容易,類似 ESP8266 NodeMCU
因此架設網頁伺服器變得更容易,類似 ESP8266 NodeMCU
使用MicroPython
製作 HTML檔案 讓指令能透過網頁指示 Raspberry Pi Pico W 輸出訊號來控制電子零件
<!-- ########## index.html ########## -->
<!DOCTYPE html>
<html lang="zh-Hant-HK">
	<head>
		<meta http-equiv="Content-Type" content="text/html; charset=UTF-8"/>
		<title>Raspberry Pi Pico W Test</title>
		<style>
button {
	font-size: 36pt;
}
		</style>
		<script>
function loadPage(link) {
	var xhr = new XMLHttpRequest();
	xhr.open("GET", link, true);
	xhr.send();
}
		</script>
	</head>
	<body>
		<div>
			<div><button onclick="loadPage('/led-on');">LED On</button></div>
			<div><button onclick="loadPage('/led-off');">LED Off</button></div>
		</div>
	</body>
</html>
在下避免在下的 Wi-Fi SSID 及 密碼 不慎貼在主程式中
因此將 設定檔 儲存為獨立檔案,並在主程式匯入設定檔
因此將 設定檔 儲存為獨立檔案,並在主程式匯入設定檔
########## wificonfig.py ##########
ssid = "Your Wi-Fi SSID"
password = "Your Wi-Fi Password"
MicroPython 的主程式檔案名同樣必須是 main.py
########## main.py ##########
import machine, time, network, socket
import wificonfig

led = machine.Pin("LED", machine.Pin.OUT)

led.value(True)

wlan = network.WLAN(network.STA_IF)
wlan.active(True)
wlan.connect(wificonfig.ssid, wificonfig.password)

connected = False
for i in range(256):
	status = wlan.status()
	if status == network.STAT_GOT_IP:
		connected = True
		ifconfig = wlan.ifconfig()
		ip = ifconfig[0]
		mask = ifconfig[1]
		gateway = ifconfig[2]
		dns = ifconfig[3]
		print("Visit: http://" + ip)
		break
	elif status == network.STAT_IDLE or status == network.STAT_CONNECTING:
		pass
	elif status == network.STAT_WRONG_PASSWORD or status == network.STAT_NO_AP_FOUND or status == network.STAT_CONNECT_FAIL:
		raise RuntimeError("Wi-Fi Connection Failure")
	time.sleep(1)
if not connected:
	raise RuntimeError("Wi-Fi Connection Timeout")

addressInfo = socket.getaddrinfo("0.0.0.0", 80)
address = addressInfo[0][-1]
sock = socket.socket()
sock.setsockopt(socket.SOL_SOCKET, socket.SO_REUSEADDR, 1)
sock.bind(address)
sock.listen(True)

handle = open("index.html", "r")
html = handle.read()
handle.close()

led.value(False)

while True:
	try:
		connection, address = sock.accept()
		request = str(connection.recv(1024), "UTF-8")
"""
The 1st of line HTTP Request:
GET /led-on HTTP/1.1
the path string located at postion 4
"""
		if request.find("/led-on") == 4:
			led.value(True)
		elif request.find("/led-off") == 4:
			led.value(False)
		connection.send("HTTP/1.1 200 OK\r\nContent-Type: text/html\r\n\r\n" + html)
		connection.close()
	except OSError as e:
		print(str(e))
	time.sleep(0.001)

透過網頁 操作 Raspberry Pi Pico W 控制 電路板LED ,效果與 ESP8266 相同
由於在下不希望每個操作都要重新載入網頁,影響效率
因此使用 XMLHttpRequest 來執行操作,但不使用 XMLHttpRequest ,使用純 HTML 亦可
因此使用 XMLHttpRequest 來執行操作,但不使用 XMLHttpRequest ,使用純 HTML 亦可
使用CircuitPython
CircuitPython 最新版本的韌體已經加入支援 Wi-Fi 的函式庫
但 網頁伺服器的函式庫 (adafruit_httpserver.py) 需要到 Adafruit官方 的 GitHub頁面 下載
再將 adafruit_httpserver.py 存放到 Raspberry Pi Pico W 儲存空間的 lib目錄 中
但 網頁伺服器的函式庫 (adafruit_httpserver.py) 需要到 Adafruit官方 的 GitHub頁面 下載
再將 adafruit_httpserver.py 存放到 Raspberry Pi Pico W 儲存空間的 lib目錄 中
import digitalio, board, time, wifi, socketpool, adafruit_httpserver
import wificonfig

led = digitalio.DigitalInOut(board.LED)
led.direction = digitalio.Direction.OUTPUT

led.value = True

wifi.radio.connect(wificonfig.ssid, wificonfig.password)
ip = str(wifi.radio.ipv4_address)
print("Visit: http://" + ip)
pool = socketpool.SocketPool(wifi.radio)
server = adafruit_httpserver.HTTPServer(pool)

@server.route("/")
def root(request):
	return adafruit_httpserver.HTTPResponse(status = 200, content_type = "text/html", filename = "/index.html")

@server.route("/led-on")
def led_on(request):
	led.value = True
	return adafruit_httpserver.HTTPResponse()

@server.route("/led-off")
def led_off(request):
	led.value = False
	return adafruit_httpserver.HTTPResponse()

led.value = False

#server.serve_forever(ip)
server.start(ip)
while True:
	try:
		server.poll()
	except Except as e:
		print(str(e))
	time.sleep(0.001)
由於 wificonfig.py 及 index.html 完全相同,因此在下不重覆
使用 CircuitPython 製作的網頁伺服器的語法比 MicroPython 簡單,編排路徑位置亦比較有條理

但正式運作時發現使用 CircuitPython 的 adafruit_httpserver 回應反應不及 MicroPython 的 socket 快
而且不論在下使用 server.serve_forever() 還是 server.start() 配合 server.poll() ,經常發生 網頁伺服器沒有回應的狀態
而且不論在下使用 server.serve_forever() 還是 server.start() 配合 server.poll() ,經常發生 網頁伺服器沒有回應的狀態

在下使用 curl 向 Raspberry Pi Pico W 發送 HTTP Request 測試
i="0"
while [ 1 ]; do
	i=$(($i+1))
	curl --request "GET" "http://192.168.0.167/led-on" 2>"/dev/null"
	return="${?}"
	echo "${i}"
	if [ "${return}" = "0" ]; then
		echo ""
		break
	fi
done
發現經常要重覆多次才能成功,最嚴重需要重試超過500次才能成功
因此若果要建立穩定的 IOT服務,CircuitPython 暫時並未適合
(但在下比較喜歡使用 CircuitPython ,能夠像 卸除式儲存裝置 般直接開啟 Raspberry Pi Pico W 並儲存檔案)
因此若果要建立穩定的 IOT服務,CircuitPython 暫時並未適合
(但在下比較喜歡使用 CircuitPython ,能夠像 卸除式儲存裝置 般直接開啟 Raspberry Pi Pico W 並儲存檔案)
使用Arduino
基本上語法與 ESP6288 NodeMCU 相似,只是改為使用 Arduino 預設提供的函式庫即可
////////// .ino file //////////
#include <WebServer.h>
#include <WiFi.h>
#include "wificonfig.h"
#include "html.h"

WebServer server = WebServer(80);

void setup(void) {
	Serial.begin(115200);
	pinMode(LED_BUILTIN, OUTPUT);
	digitalWrite(LED_BUILTIN, HIGH);
	WiFi.begin(MY_SSID, MY_PASSWORD);
	while (WiFi.status() != WL_CONNECTED) {
		delay(1000);
		Serial.print(".");
	}
	digitalWrite(LED_BUILTIN, LOW);
	Serial.print("Visit: http://");
	Serial.println(WiFi.localIP());
	server.on("/", [] {
		server.send(200, "text/html", HTML);
	});
	server.on("/led-on", [] {
		digitalWrite(LED_BUILTIN, HIGH);
	});
	server.on("/led-off", [] {
		digitalWrite(LED_BUILTIN, LOW);
	});
	server.begin();
}

void loop() {
	server.handleClient();
	delay(1);
}
////////// wificonfig.h //////////
#define MY_SSID "Your-Wifi-SSID"
#define MY_PASSWORD "Your-Wifi-Password"
////////// html.h //////////
const String PROGMEM HTML = "<!DOCTYPE html>\
<html lang=\"zh-Hant-HK\">\
	<head>\
		<meta http-equiv=\"Content-Type\" content=\"text/html; charset=UTF-8\"/>\
		<title>Raspberry Pi Pico W Test</title>\
		<style>\
button {\
	font-size: 36pt;\
}\
		</style>\
		<script>\
function loadPage(link) {\
	var xhr = new XMLHttpRequest();\
	xhr.open(\"GET\", link, true);\
	xhr.send();\
}\
		</script>\
	</head>\
	<body>\
		<div>\
			<div><button onclick=\"loadPage('/led-on');\">LED On</button></div>\
			<div><button onclick=\"loadPage('/led-off');\">LED Off</button></div>\
		</div>\
	</body>\
</html>";
製作網頁的方法都大致相同,只是 Arduino 無法讀取儲存空間的原生檔案
因此在下使用 標頭檔案,方便 .ino 檔案能以 #include 的方式匯入資料
另外,如果需要斷行令檔案內容易於閱讀,在斷行前需要加上 \ 反斜線 (Backslash) ,類似 bash
在下亦使用 PROGMEM 將頁面內容這類固定的資料儲存到 快閃記憶體,降低 動態記憶體 的使用量
因此在下使用 標頭檔案,方便 .ino 檔案能以 #include 的方式匯入資料
另外,如果需要斷行令檔案內容易於閱讀,在斷行前需要加上 \ 反斜線 (Backslash) ,類似 bash
在下亦使用 PROGMEM 將頁面內容這類固定的資料儲存到 快閃記憶體,降低 動態記憶體 的使用量
總結
除了 電路板LED , Raspberry Pi Pico W 引腳佈局與 Raspberry Pi Pico 完全相同
因此不論使用 MicroPython 、 CircuitPython 或 Arduino 的 AVR-C 程式,基本上只是稍作修改便可以立即使用
而且最重要只是 6美金,便內建 Wi-Fi 及 藍牙 兩種常見的 無線模組,方便又實用,不過 暫時未有支援藍牙模組的函式庫
不過在下相信當所有支援 Raspberry Pi Pico W 的韌體正式版推出後,稍後會加入相關函式庫
但只是內建 Wi-Fi模組 已經可以方便地製作 IOT服務
因此不論使用 MicroPython 、 CircuitPython 或 Arduino 的 AVR-C 程式,基本上只是稍作修改便可以立即使用
而且最重要只是 6美金,便內建 Wi-Fi 及 藍牙 兩種常見的 無線模組,方便又實用,不過 暫時未有支援藍牙模組的函式庫
不過在下相信當所有支援 Raspberry Pi Pico W 的韌體正式版推出後,稍後會加入相關函式庫
但只是內建 Wi-Fi模組 已經可以方便地製作 IOT服務
沒有留言 :
張貼留言