之前曾經借用 Arduino IOT Cloud 製作遙距控制的網頁伺服器
但免費版的 Arduino IOT Cloud 的功能及自訂化不多
如果更多自訂化功能便需要向 Arduino IOT Cloud 購買完整功能
支持 Arduino 是不錯的選擇,但如果需要降低成本又具備自訂化功能,仍然是有方法
但免費版的 Arduino IOT Cloud 的功能及自訂化不多
如果更多自訂化功能便需要向 Arduino IOT Cloud 購買完整功能
支持 Arduino 是不錯的選擇,但如果需要降低成本又具備自訂化功能,仍然是有方法
最簡單的方法就自建網頁伺服器或註冊免費網頁伺服器
使用 ESP8266 的 HTTP請求 功能,讓 ESP8266 根據回應內容,控制引腳訊號
使用 ESP8266 的 HTTP請求 功能,讓 ESP8266 根據回應內容,控制引腳訊號
線路原型
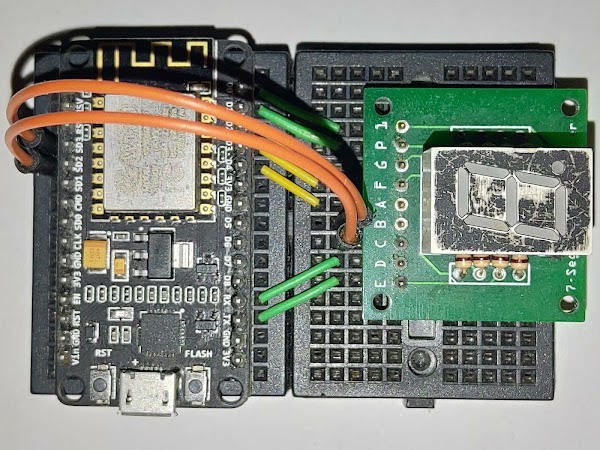
使用 (共陽)七段顯示器 簡單測試
接駁線路
實際接駁線路
編寫程式碼
#include <ESP8266WiFi.h>
#include <ESP8266HTTPClient.h>

WiFiClient wifiClient = WiFiClient();

const byte VCC = 16;
const byte GND[] = {2, 10, 9, 3, 1, 0, 4, 5};

// place your WiFi SSID
char* ssid = "";
// place your WiFi Password
char* password = "";
// place your HTTP Server URL
char* url = "";

void setup() {
	pinMode(VCC, OUTPUT);
	digitalWrite(VCC, HIGH);
	for (byte i = 0; i < sizeof(GND) / sizeof(byte); i++) {
		pinMode(GND[i], OUTPUT);
		digitalWrite(GND[i], HIGH);
	}
	WiFi.begin(ssid, password);
	while (WiFi.status() != WL_CONNECTED) {
		delay(500);
		digitalWrite(16, !digitalRead(16));
	}
	digitalWrite(16, HIGH);
}

void loop() {
	if (WiFi.status() == WL_CONNECTED) {
		String response = httpGETRequest(url);
		byte data = response.charAt(0);
		for (byte i = 0; i < sizeof(GND) / sizeof(byte); i++) {
			digitalWrite(GND[i], (data & (1 << i)) == 0);
		}
	}
	delay(1000);
}

String httpGETRequest(char* serverPath) {
	HTTPClient httpClient = HTTPClient();
	httpClient.begin(wifiClient, serverPath);
	int httpResponseCode = httpClient.GET();
	String response = "";
	if (httpResponseCode > 0) {
		response = httpClient.getString();
	}
	httpClient.end();
	return response;
}
ESP8266 除了能成為臨時伺服器,回應 HTTP請求,亦可以發送 HTTP請求到其他伺服器
根據獲取的回應,執行特定操作
根據獲取的回應,執行特定操作
編寫網頁
<?php
header("Content-Type: image/svg+xml; charset=UTF-8");
$file = "data.txt";
if (!file_exists($file)) {
file_put_contents($file, pack("C", 0));
}
if (isset($_POST["data"])) {
file_put_contents($file, pack("C", $_POST["data"]));
die();
}
?>
<svg width="1000" height="1400" version="1.1" viewBox="0 0 50000 70000" xmlns="http://www.w3.org/2000/svg">
<script>
function updateData(data) {
data = "data=" + data;
var xhr = new XMLHttpRequest();
xhr.open("POST", window.location.href, true);
xhr.setRequestHeader("Content-type", "application/x-www-form-urlencoded");
xhr.send(data);
}
window.addEventListener("load", function() {
var segments = [
document.getElementById("a"),
document.getElementById("b"),
document.getElementById("c"),
document.getElementById("d"),
document.getElementById("e"),
document.getElementById("f"),
document.getElementById("g"),
document.getElementById("p")
];
window.setInterval(function() {
var xhr = new XMLHttpRequest();
xhr.responseType = "arraybuffer";
xhr.open("GET", "<?php echo $file; ?>", true);
xhr.addEventListener("readystatechange", function() {
if (this.readyState == XMLHttpRequest.DONE && this.status == 200) {
var data = new Uint8Array(this.response);
for (var i in segments) {
var j = 1 << i;
segments[i].setAttribute("fill", "#" + (((data & j) > 0) ? "FF0000" : "444444"));
segments[i].setAttribute("onclick", "updateData(" + (data ^ j) + ");");
}
}
});
xhr.send();
}, 1000);
});
</script>
<rect width="50000" height="70000" fill="#000000"/>
<polygon id="a" points="41776,10248 38792,14716 19424,14716 16447,10247 17935,08759 40284,08759"/>
<polygon id="b" points="43264,11735 44753,14717 41775,31109 38792,34085 35815,31109 38792,16206"/>
<polygon id="c" points="38792,35576 40284,38553 37305,54945 34324,57925 31345,54945 34324,40046"/>
<polygon id="d" points="07505,59410 10486,54945 29857,54945 32835,59414 31345,60902 08995,60902"/>
<polygon id="e" points="07505,38554 10486,35576 13464,38554 10486,53453 06013,57924 04526,54945"/>
<polygon id="f" points="17936,14717 14955,29619 10486,34085 08995,31108 11976,14716 14955,11734"/>
<polygon id="g" points="34325,31108 37305,34084 34325,37063 14955,37063 11975,34084 14955,31108"/>
<circle id="p" cx="41137" cy="57921" r="03138"/>
</svg>
編寫 七段顯示器 的 SVG 內容
以上只是參考程式編碼,閣下可以編寫更好的程式碼測試
測試效果
在下在本機建立網頁伺服器測試,由於屬於內聯網絡,測試效果相對流暢,接近同步更新
但在下使用網頁寄存服務,網頁更新內容後,ESP8266 會有延遲
但在下使用網頁寄存服務,網頁更新內容後,ESP8266 會有延遲
總結
設定上其實比使用 Arduino IOT Cloud 更簡單
只需要建立網頁伺服器,改變特定檔案的內容,再讓 ESP8266 讀取該檔案的內容
便可以透過網頁控制 ESP8266 再控制 七段顯示器 顯示資料
只需要建立網頁伺服器,改變特定檔案的內容,再讓 ESP8266 讀取該檔案的內容
便可以透過網頁控制 ESP8266 再控制 七段顯示器 顯示資料
亦可以使用網頁元件範本,加強美觀或互動效果,可以製作比 Arduino IOT Cloud 元件更漂亮的網頁介面
有些網頁寄存服務無法即時更新檔案,需要改用讀取資料庫,效果大致相同
而且使用資料庫還可以紀錄更多資料,例如:更新時間、IP地址、設定值等內容
可以掌握操作習慣,將來編寫自動化操作
而且使用資料庫還可以紀錄更多資料,例如:更新時間、IP地址、設定值等內容
可以掌握操作習慣,將來編寫自動化操作


沒有留言 :
張貼留言