最近在下因為需要整理大量 USB線 ,並區分 電源線 及 傳輸線,並丟棄效能太低的 USB線
及 了解流動電池預計差電時間,因此尋找一些能夠偵測 電量資訊 及 差電時間 的 電量檢測器
及 了解流動電池預計差電時間,因此尋找一些能夠偵測 電量資訊 及 差電時間 的 電量檢測器
測試工具外觀
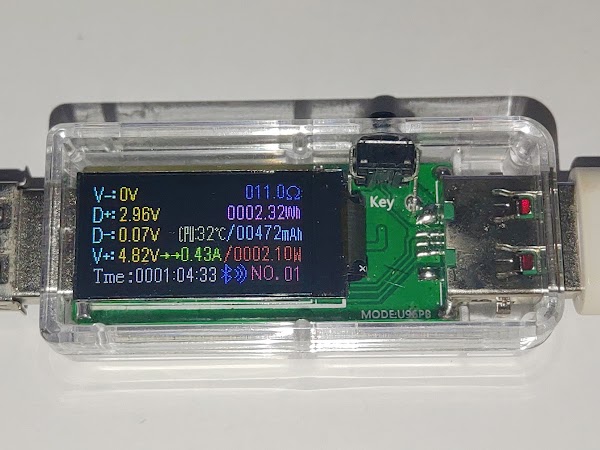
USB藍牙電量檢測器 正面
USB藍牙電量檢測器 背面
WCH 的 CH573F晶片,內置 藍牙低功耗 功能
JL 的 BPOK240晶片,但無法找到相關的 資料表
接駁電源後會顯示 電量 、 溫度 、 累計時間 等資料
要透過藍牙檢視資料,必須在 Android 或 iOS 指定的應用程式才能顯示資料
但在下對於一定要使用電話應用程式檢視資料覺得非常麻煩
因此在下嘗試使用 Web Bluetooth API 來存取資料
如果成功,便可以在電腦上使用 網頁瀏覽器 檢視資料
因此在下嘗試使用 Web Bluetooth API 來存取資料
如果成功,便可以在電腦上使用 網頁瀏覽器 檢視資料
偵測藍牙訊號
在下使用由 Nordic Semiconductor 提供的 藍牙訊號檢查工具 來分析藍牙裝置所發出的訊號
連接後會顯示藍牙裝置的 服務(Service)
點選 更多選項圖示 > Show log
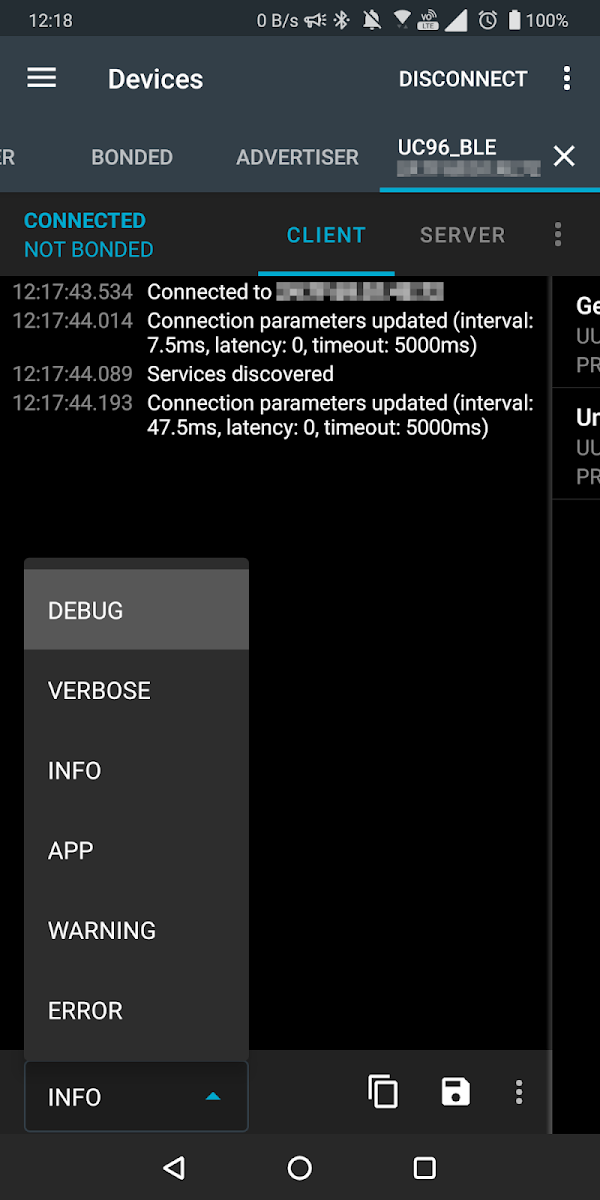
將檢視內容的詳細程度改變為 DEBUG
除了顯示一般服務外,即使標示為 不明(Unknown) 都會顯示所有資料
例如在下使用的 USB藍牙電量檢測器 顯示資料
1 2 3 4 | Unknown Service (0000ffe0-0000-1000-8000-00805f9b34fb)- Unknown Characteristic [N W WNR] (0000ffe1-0000-1000-8000-00805f9b34fb) Client Characteristic Configuration (0x2902)- Unknown Characteristic [W WNR] (0000ffe2-0000-1000-8000-00805f9b34fb) |
當中的:
- N 表示 通知(Notify)
- W 表示 寫入(Write)
- WNR 表示 寫入但不回應(Write No Response)
再顯示指令
1 | gatt.setCharacteristicNotification(0000ffe1-0000-1000-8000-00805f9b34fb, true) |
表示測試中,使用了 0000ffe1-0000-1000-8000-00805f9b34fb 特徵(Characteristic)
使用 0000ffe0-0000-1000-8000-00805f9b34fb 服務,並連接到 0000ffe1-0000-1000-8000-00805f9b34fb 特徵獲取資料
由於 0000ffe1-0000-1000-8000-00805f9b34fb 特徵 擁有 通知 屬性,藍牙裝置根據特定週期自動向 宿主(Host) 回應資料
而不需要 宿主 不斷主動發送請求來獲取資料
由於 0000ffe1-0000-1000-8000-00805f9b34fb 特徵 擁有 通知 屬性,藍牙裝置根據特定週期自動向 宿主(Host) 回應資料
而不需要 宿主 不斷主動發送請求來獲取資料
使用 Web Bluetooth API 連接
暫時只有 Chromium Base 的網頁瀏覽器才支援 Web Bluetooth API ,在下使用 Chrome 測試
Chrome 的 Web Bluetooth API 預設沒有啟動,需要到 chrome://flags 搜尋 Bluetooth
並將 Web Bluetooth API 的功能啟動,再重新啟動網頁瀏覽器,才能使用 Web Bluetooth API
Chrome 的 Web Bluetooth API 預設沒有啟動,需要到 chrome://flags 搜尋 Bluetooth
並將 Web Bluetooth API 的功能啟動,再重新啟動網頁瀏覽器,才能使用 Web Bluetooth API
在下製作一個簡單的 HTML檔案 測試藍牙連接
1 2 3 4 5 6 7 8 9 10 11 12 13 14 15 16 17 18 19 20 21 22 23 24 25 26 27 | // javascript.jsfunction WebBluetoothAPI(serviceUUID, characteristicUUID) { this.connect = function() { navigator.bluetooth.requestDevice({ "filters": [ { "services": [ serviceUUID ] } ] }).then(function(device) { console.log("device found"); return device.gatt.connect(); }).then(function(server) { console.log("server found"); return server.getPrimaryService(serviceUUID); }).then(function(service) { console.log("service found"); return service.getCharacteristic(characteristicUUID); }).then(function(characteristic) { console.log("characteristic found"); }).catch(function(exception) { console.log(exception); }); };} |
1 2 3 4 5 6 7 8 9 10 11 12 13 14 15 | <!-- index.html --><!DOCTYPE html><html lang="en"> <head> <meta http-equiv="Content-Type" content="text/html; charset=UTF-8"/> <title>Web Bluetooth API</title> <script src="javascript.js"></script> <script>var webBluetoothAPI = new WebBluetoothAPI("0000ffe0-0000-1000-8000-00805f9b34fb", "0000ffe1-0000-1000-8000-00805f9b34fb"); </script> </head> <body> <button onclick="webBluetoothAPI.connect();">Connect</button> </body></html> |
按下 Connect 後,會顯示附近的 藍牙訊號
選擇 USB藍牙電量檢測器 的裝置,然後按 配對,便會連接 藍牙裝置
選擇 USB藍牙電量檢測器 的裝置,然後按 配對,便會連接 藍牙裝置
由於在下使用 console.log 輸出資料,因此需要開啟 開發人員工具 檢視輸出內容
接駁到 負載(Load) ,USB藍牙電量檢測器 會顯示差電資料,並開始計時
確認能夠連接到 藍牙裝置 後,嘗試獲取 通知 的資料
1 2 3 4 5 6 7 8 9 10 11 12 13 14 15 16 17 18 19 20 21 22 23 24 25 26 27 28 29 30 31 32 33 34 35 | // javascript.jsfunction WebBluetoothAPI(serviceUUID, characteristicUUID) { this.connect = function() { navigator.bluetooth.requestDevice({ "filters": [ { "services": [ serviceUUID ] } ] }).then(function(device) { console.log("device found"); return device.gatt.connect(); }).then(function(server) { console.log("server found"); return server.getPrimaryService(serviceUUID); }).then(function(service) { console.log("service found"); return service.getCharacteristic(characteristicUUID); }).then(function(characteristic) { console.log("characteristic found"); characteristic.startNotifications().then(function() { console.log("notification started"); characteristic.addEventListener("characteristicvaluechanged", characteristicvaluechangedEventHandler); }); }).catch(function(exception) { console.log(exception); }); }; var characteristicvaluechangedEventHandler = function(characteristicvaluechangedEvent) { let byteArray = new Uint8Array(characteristicvaluechangedEvent.target.value.buffer); console.log(byteArray.join(",")); };} |
分析訊號
開發人員工具 顯示 序列資訊,例如:
1 | 255,85,1,3,0,1,226,0,0,43,0,1,216,0,0,0,232,0,7,1,40,3,32,0,1,4,33,60,9,105,0,0,1,44,0,248 |
根據由 https://github.com/NiceLabs/atorch-console 的資料及在下的觀察
這款 U96PB 的 USB藍牙電量檢測器 序列資料的內容如下:
這款 U96PB 的 USB藍牙電量檢測器 序列資料的內容如下:
| 偏移 | 位元組長度 | 類型 | 功能 | |
|---|---|---|---|---|
| 十進制 | 十六進制 | |||
| 0 | 0x00 | 2 | 無符號數值 | 標頭 |
| 1 | 0x01 | |||
| 2 | 0x02 | 1 | 無符號數值 | 操作類型
|
| 3 | 0x03 | 1 | 無符號數值 | 差電類型
|
| 4 | 0x04 | 3 | 無符號數值 | 電壓(Voltage) (需要 除以100) |
| 5 | 0x05 | |||
| 6 | 0x06 | |||
| 7 | 0x07 | 3 | 無符號數值 | 電流(Current) (需要 除以100) |
| 8 | 0x08 | |||
| 9 | 0x09 | |||
| 10 | 0x0A | 3 | 無符號數值 | 累計毫安每小時(mAh) |
| 11 | 0x0B | |||
| 12 | 0x0C | |||
| 13 | 0x0D | 4 | 無符號數值 | 累計功率每小時(Wh) (需要 除以100) |
| 14 | 0x0E | |||
| 15 | 0x0F | |||
| 16 | 0x10 | |||
| 17 | 0x11 | 2 | 無符號數值 | USB D- 訊號電壓 (需要 除以100) |
| 18 | 0x12 | |||
| 19 | 0x13 | 2 | 無符號數值 | USB D+ 訊號電壓 (需要 除以100) |
| 20 | 0x14 | |||
| 21 | 0x15 | 2 | 有符號數值 | 攝氏度(Degree Celsius),第15位元表達正負 當資料為負數時,要以二補碼方式計算 |
| 22 | 0x16 | |||
| 23 | 0x17 | 2 | 無符號數值 | 累計差電時數(Total Charge Hours) |
| 24 | 0x18 | |||
| 25 | 0x19 | 1 | 無符號數值 | 累計差電分鐘(Total Charge Minutes) |
| 26 | 0x1A | 1 | 無符號數值 | 累計差電秒數(Total Charge Seconds) |
| 27 | 0x1B | 1 | 無符號數值 | 自動休眠秒數(Auto Sleep Seconds) |
| 28 | 0x1C | 2 | 無符號數值 | 最高保護電壓(Maximum Protection Voltage) (需要 除以100) |
| 29 | 0x1D | |||
| 30 | 0x1E | 2 | 無符號數值 | 最低保護電壓(Minimum Protection Voltage) (需要 除以100) |
| 31 | 0x1F | |||
| 32 | 0x20 | 2 | 無符號數值 | 最高保護電流(Maximum Protection Current) (需要 除以100) |
| 33 | 0x21 | |||
| 34 | 0x22 | 1 | 無符號數值 | 背光光度(Backlight) |
| 35 | 0x23 | 1 | 無符號數值 | 校驗和(Checksum) |
由於 電阻 、 功率 、 華氏度 是計算而來的資料,因此不會在序列資料中顯示
但要計算這些資料亦很簡單:
但要計算這些資料亦很簡單:
- 電阻 = 電壓 / 電流
- 功率 = 電壓 * 電流
- 華氏度 = 攝氏度 * 9 / 5 + 32
留意:當沒有負載時,電流為0,會導致計算電阻時會出錯(除以0為沒有意義)
另外有些資料由多組資料表示,例如例子中的電壓資料為 0x00, 0x01, 0xE2
由於資料以 最高位順序(Big Endian) ,即是資料會由陣列中最高位開始計算
由於資料以 最高位順序(Big Endian) ,即是資料會由陣列中最高位開始計算
1 | (0xE2 + (0x01 << 8) + (0x00 << 16)) / 100 |
計算結果是 4.82
編寫以 最高位順序 陣列計算的功能
1 2 3 4 5 6 7 8 9 10 11 12 13 14 15 | function calculate(byteArray, signed) { let sum = 0; for (let i = 0; i < byteArray.length; i++) { sum += byteArray[byteArray.length - i - 1] << (8 * i); } // 使用二補數來計算有符號數值 if (signed && (sum >> (8 * byteArray.length - 1)) > 0) { sum ^= -(1 << (8 * byteArray.length)); } return sum;}// byteArray.slice(4, 7) 會截取 byteArray[4], byteArray[5], byteArray[6] 的資料// 並傳回 索引(index) 由 0 開始的陣列console.log(calculate(byteArray.slice(4, 7)) / 100);// 電壓的計算結果需要 除以 100 |
能夠正確計算資料後,便可以透過網頁顯示資料
控制訊號
除了讀取資料,還可以將資料寫入來控制 USB藍牙電量檢測器
| 偏移 | 資料 | 功能 | ||
|---|---|---|---|---|
| 十進制 | 十六進制 | 十進制 | 十六進制 | |
| 0 | 0x00 | 255 | 0xFF | 標頭 |
| 1 | 0x01 | 85 | 0x55 | |
| 2 | 0x02 | 17 | 0x11 | 宣告序列訊號為指令操作 |
| 3 | 0x03 | 3 | 0x03 | 差電類型,與報告相同 |
| 4 | 0x04 | ? | ? | 指令 |
| 5 | 0x05 | ? | ? | 4位元組參數(最高位順序) |
| 6 | 0x06 | ? | ? | |
| 7 | 0x07 | ? | ? | |
| 8 | 0x08 | ? | ? | |
| 9 | 0x09 | ? | ? | 校驗和 |
指令及功能
控制 USB藍牙電量檢測器 需要對應的指令
| 指令 | 功能 | |
|---|---|---|
| 十進制 | 十六進制 | |
| 1 | 0x01 | 重設累計功率每小時(Reset Wh) |
| 2 | 0x02 | 重設累計毫安培每小時(Reset mAh) |
| 3 | 0x03 | 重設累計時間(Reset Time) |
| 5 | 0x05 | 前往下一筆紀錄(Next Record) |
| 49 | 0x31 | 進入設定模式(Setup) |
| 50 | 0x32 | 離開設定模式(Exit) |
| 51 | 0x33 | 移到上一頁或增加設定值(Next/Inceament) |
| 52 | 0x34 | 移到下一頁或減少設定值(Previous/Deceament) |
指令要正確寫入,最麻煩是需要計算 校驗和(Checksum)
幸好 https://github.com/NiceLabs/atorch-console 都有提供 校驗和 的計算方法
計算方法使用 Lambda語法 編寫,雖然 Lambda語法 減少語法內容,但在下認為這種語法比傳統計算方法複雜
因此在下修改為以 For Loop 編寫,比較更容易明白,移植亦比較簡單
幸好 https://github.com/NiceLabs/atorch-console 都有提供 校驗和 的計算方法
計算方法使用 Lambda語法 編寫,雖然 Lambda語法 減少語法內容,但在下認為這種語法比傳統計算方法複雜
因此在下修改為以 For Loop 編寫,比較更容易明白,移植亦比較簡單
1 2 3 4 5 6 7 8 9 10 | function checksum(byteArray) { let checksum = 0; for (let i = 2; i < byteArray.length - 1; i++) { checksum += byteArray[i] & 0xFF; } // the last element is checksum byteArray[byteArray.length - 1] = checksum ^ 0x44; return byteArray;}let byteArray = checkcum([0xFF, 0x55, 0x11, 0x03, 0x33, 0x00, 0x00, 0x00, 0x00, 0x00]); |
1 2 3 4 5 6 7 8 9 10 11 12 13 14 15 16 17 18 19 20 21 22 23 24 25 26 27 28 29 30 31 32 33 34 35 36 37 38 39 40 41 42 43 44 45 46 47 48 49 50 51 52 53 54 55 56 57 58 59 60 61 62 63 64 65 66 67 68 69 70 71 72 73 74 75 76 77 78 79 80 81 82 83 84 85 | // javascript.jsfunction WebBluetoothAPI(serviceUUID, characteristicUUID) { var serviceCharacteristic; this.connect = function() { navigator.bluetooth.requestDevice({ "filters": [ { "services": [ serviceUUID ] } ] }).then(function(device) { console.log("device found"); return device.gatt.connect(); }).then(function(server) { console.log("server found"); return server.getPrimaryService(serviceUUID); }).then(function(service) { console.log("service found"); return service.getCharacteristic(characteristicUUID); }).then(function(characteristic) { console.log("characteristic found"); serviceCharacteristic = characteristic; characteristic.startNotifications().then(function() { console.log("notification started"); characteristic.addEventListener("characteristicvaluechanged", characteristicvaluechangedEventHandler); }); }).catch(function(exception) { console.log(exception); }); }; var characteristicvaluechangedEventHandler = function(characteristicvaluechangedEvent) { let byteArray = new Uint8Array(characteristicvaluechangedEvent.target.value.buffer); let data = {}; data["header"] = [byteArray[0], byteArray[1]]; data["operation"] = byteArray[2]; data["charge"] = byteArray[3]; data["voltage"] = calculate(byteArray.slice(4, 7)) / 100; data["current"] = calculate(byteArray.slice(7, 10)) / 100; data["mah"] = calculate(byteArray.slice(10, 13)); data["wh"] = calculate(byteArray.slice(13, 17)) / 100; data["usb-"] = calculate(byteArray.slice(17, 19)) / 100; data["usb+"] = calculate(byteArray.slice(19, 21)) / 100; data["temperature"] = byteArray[22]; data["hours"] = calculate(byteArray.slice(23, 25)); data["minutes"] = byteArray[25]; data["seconds"] = byteArray[26]; data["sleep"] = byteArray[27]; data["max-voltage"] = calculate(byteArray.slice(28, 30)) / 100; data["min-voltage"] = calculate(byteArray.slice(30, 32)) / 100; data["max-current"] = calculate(byteArray.slice(32, 34)) / 100; data["backlight"] = byteArray[34]; data["checksum"] = byteArray[35]; console.log(Object.keys(data).map(function(key) { return key + " = " + data[key]; }).join("\n")); }; var calculate = function(byteArray, signed) { let sum = 0; for (let i = 0; i < byteArray.length; i++) { sum += byteArray[byteArray.length - i - 1] << (8 * i); } if (signed && (sum & (1 << (8 * byteArray.length - 1))) > 0) { sum ^= -(1 << (8 * byteArray.length)); } return sum; } var setChecksum = function(byteArray) { let checksum = 0; for (let i = 2; i < byteArray.length - 1; i++) { checksum = (checksum + byteArray[i]) & 0xFF; } byteArray[byteArray.length - 1] = checksum ^ 0x44; return byteArray; }; var write = function(byteArray) { byteArray = setChecksum(byteArray); byteArray = new Uint8Array(byteArray); serviceCharacteristic.writeValue(byteArray.buffer); }; this.next = function() { write([0xFF, 0x55, 0x11, 0x03, 0x33, 0x00, 0x00, 0x00, 0x00, 0x00]); };} |
1 2 3 4 5 6 7 8 9 10 11 12 13 14 15 16 | <!-- index.html --><!DOCTYPE html><html lang="en"> <head> <meta http-equiv="Content-Type" content="text/html; charset=UTF-8"/> <title>Web Bluetooth API</title> <script src="javascript.js"></script> <script>var webBluetoothAPI = new WebBluetoothAPI("0000ffe0-0000-1000-8000-00805f9b34fb", "0000ffe1-0000-1000-8000-00805f9b34fb"); </script> </head> <body> <button onclick="webBluetoothAPI.connect();">Connect</button> <button onclick="webBluetoothAPI.next();">Connect</button> </body></html> |
可以透過網頁控制 USB藍牙電量檢測器
總結
當 宿主程式 使用 射頻通訊(Radio frequency Communication (RFCOMM)) 偵測訊號時
會顯示 USB藍牙電量檢測器 的藍牙名稱為 UC96_SPP
而使用 藍牙低功耗(Bluetooth Low Energy (BLE)) 會顯示 UC96_BLE
即是裝置支援舊版本或新版本的藍牙通訊模式
會顯示 USB藍牙電量檢測器 的藍牙名稱為 UC96_SPP
而使用 藍牙低功耗(Bluetooth Low Energy (BLE)) 會顯示 UC96_BLE
即是裝置支援舊版本或新版本的藍牙通訊模式
過去都曾經試用 Web Bluetooth API ,但當時只是因為測試效果,並沒有詳細理解原理
但這次在下想正式使用 Web Bluetooth API 向藍牙裝置接收及發送訊號,因此正式學習使用方法
但這次在下想正式使用 Web Bluetooth API 向藍牙裝置接收及發送訊號,因此正式學習使用方法
當中在下最大的發現是,當使用 Web Bluetooth API 連接服務或特徵時
例如在下正在使用 USB藍牙電量檢測器 需要以 UUID 的方式連接時
UUID 的英文字母必須使用小寫 才能連接,大寫是不被接受
例如在下正在使用 USB藍牙電量檢測器 需要以 UUID 的方式連接時
UUID 的英文字母必須使用小寫 才能連接,大寫是不被接受
在下並不知道有其他人都有逆向工程這種 USB藍牙電量檢測器 的想法
最初分析藍牙訊號時,花了大量時間不斷比較每組資料與 USB藍牙電量檢測器 的差異
但當中仍然有大量資訊無法分析,在網上尋找資料時,發現有相似的專案
雖然專案中並沒有提供與在下使用的 USB藍牙電量檢測器 的相同型號資料,但其他型號仍然有參考作用
因此進度大幅提升
最初分析藍牙訊號時,花了大量時間不斷比較每組資料與 USB藍牙電量檢測器 的差異
但當中仍然有大量資訊無法分析,在網上尋找資料時,發現有相似的專案
雖然專案中並沒有提供與在下使用的 USB藍牙電量檢測器 的相同型號資料,但其他型號仍然有參考作用
因此進度大幅提升
越來越多智能產品需要使用 Android 或 iOS 的應用程式來讀取或控制
但在下覺得這種設計的限制非常大;其實網頁技術越來越全面,方便不同平台才是良好的設計
反而是某些平台或系統限制使用者及開發者的選擇,結果只能以不方便的方法使用科技產品
當平台或系統失效時,跟隨的工具都會一同失效,使用者及開發者同樣損失
但在下覺得這種設計的限制非常大;其實網頁技術越來越全面,方便不同平台才是良好的設計
反而是某些平台或系統限制使用者及開發者的選擇,結果只能以不方便的方法使用科技產品
當平台或系統失效時,跟隨的工具都會一同失效,使用者及開發者同樣損失
在下將網頁版上載到 https://hkgoldenmra.bitbucket.io/html5-web-bluetooth-atorch-serial-monitor/
如果閣下有興趣,可以直接使用,或下載使用
如果閣下有興趣,可以直接使用,或下載使用


沒有留言 :
張貼留言